
Painting + Emojis + Galaxy?! It’s a kid’s dream come true! It’s my dream come true! I think most libraries could run this program once a month and it would fill up every time with new kids. It is incredibly appealing, plus it’s a skill-based challenge that both parents and kids love. I run this one hour program for ages 6 – 13, and mainly get ages 8 – 10 attending.
Everything I learned about Galaxy Emoji Painting I learned from my artist husband, Danny Fast. But you don’t need to be an artist to run this program. You just need a good set of instructions, a bunch of paint, and a little bravery.
Step-by-Step Painting Instructions:
- Using a pencil, draw a large circle in the middle of your canvas to mark the emoji face. You could also pre-draw the circle for them by tracing a small plate.
- Fill the blank circle on your canvas with yellow paint.

- Paint everything but the circle black. I recommend outlining the yellow circle with a smooth black circle of paint first to make sure your don’t go over the line.
- If kids DO accidentally mix some black in with their yellow, tell them not to worry. The great thing about acrylic paint is that you can paint over it once it dries and fix any mistake.
- You can also fix a lot of painting mix-ups by using a dry paper towel to mop up the unwanted paint mark.

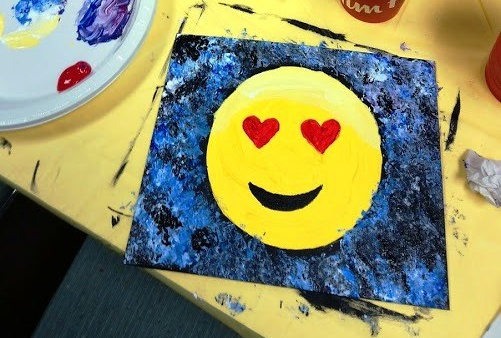
- Now it’s time to add the Emoji Face! Let kids choose whichever emoji face they want. Popular ones in my workshops have been the winking emoji, tongue out emoji, heart eyes emoji, kissing emoji and crying laughing emoji. I recommend hanging a poster or projecting an image with many emoji face options for reference.
- This is the part where you are most likely going to see some mental breakdowns. Explain to kids that they can raise their hands if the need help. Walk around the room, and give them plenty of time to get the face right.

- This is the part where you are most likely going to see some mental breakdowns. Explain to kids that they can raise their hands if the need help. Walk around the room, and give them plenty of time to get the face right.
- Take a break until the paint is dry. You could walk around the room in a snake formation waving the canvases to speed things up in a fun way!
- It’s finally time to transform the background into a galaxy. Using a scrunched-up paper towel, dab a bright colour onto the black paint like a cloud.
- This is where some personal technique comes in. Kids can use the paper towel to dab more of the colour on, or blend the colour in.
- Colours can and should mix on the canvas
- i.e. dab some blue onto the background, then dab some white on top of the blue. You will have a mixture of dark blue, light blue, and white.
- Adding dabs of white paint in with the colours helps add depth.
- Some kids like to mix 2 or 3 galaxy colours, others prefer one. Some kids use tiny bits of paper towel to dab, others use huge pieces. Let them customize as much as possible.

- Continue adding colours to the black part of the canvas until you have a beautiful galaxy print.
- Using the large brush, flick white paint onto the canvas. Those are your stars.
- You’re done!

More Tips
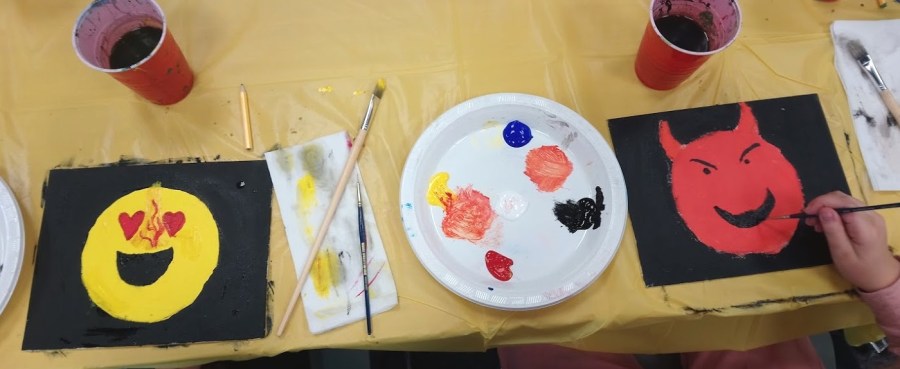
What materials do I need?
- Plates or paint palettes
- Large containers of paint in these colours: black, white, yellow, blue (not too dark), and red
- 3 paint brushes for each kid: Large, Medium, and Tiny
- A roll of paper towels
- Cups for water
- One 8 x 10″ canvas or canvas panel for each child
What if someone don’t want to do a face emoji? That’s fine! Art is about expressing yourself, not about following instructions. Just let them know that it might be more difficult, and that at the beginning they will have to sketch out the shape of the emoji instead of a circle. I have seen many painted poop emojis. My all-time favourite one:

How should I set up the room? Every painter will need enough space for all of their materials, and their elbows. Make sure you don’t seat kids too close together, otherwise you’re bound to have some spills and bumps and groans of frustration. Set each spot with a canvas or canvas board, cup of water, 3 paint brushes (tiny, medium, and large), a plate or palette with black, white, red, blue, and yellow paint, and paper towels. At the front of the room, have an easel for demonstration, a finished reference painting, extra paper towels, and extra paint.


Do I NEED to demonstrate the painting? I’m not good at painting! I would say that yes. You definitely should demonstrate the painting. This is a very easy painting. Even if you’re not great at painting, just go with it! If you act confident, kids will be impressed and more likely to feel confident themselves. Never tell kids that you are bad at art. It sets the tone for them to feel badly about their own skills. Remember, from a kid’s perspective, you ARE AMAZING at art! However, if you are feeling very nervous about painting it, hire an artist to come in and do it. And pay them for their time.
How do I make brown paint? Well you could buy it. However, I like teaching kids how to mix primary colours to get any colour they want. The secret to brown is to mix every primary colour together. It it’s too green, add some red. Too purple? Add yellow. Too orange? Add some black and blue. You can also try mixing orange, and just adding a tiny bit of black until it’s brown.
Anything else I should know about mixing paint? Darker colours can easily overpower lighter colours. Blue and black are very powerful, and should be added little by little anytime you are mixing.
How to I make sure kids don’t cry? I’ve run over 10 painting workshops for ages 6 – 13, and I’ve only had tears once. I think part of this is because we always make sure everyone knows we’re here to have fun, and if they need help, they will get help. But if a kid does have a breakdown – do your best to explain that the painting isn’t ruined! You can fix mistakes by scooping the unwanted paint up with paper towel, or painting over it once it is dry. If that doesn’t work, have them take a breather from the painting. Take a lap around the room, and stop looking at their painting for at least 3 minutes.
Any other paintings I could do? Yes! With the help of my artist love, we ran unicorn rainbow workshops, sunset workshops, Pikachu workshops, flower workshops, puppy workshops, Starry Night workshop, winter cardinal workshop, and forest workshops. Feel free to gain inspiration from these photos – just remember to credit this page!
For more painting program outlines check out my posts:
- Stencil Art – Program Outline
- Bad Art Night 2.0
- Hack That Painting – Program Outline
- Tween Club: Zombie Barbies
- Tween Club: Pizza Mania! Pizza jewelry, Pizza Tasting, and Dessert Pizza
Alright my brave, painty friends! Get on the painting party wagon and help your community grow creatively!

https://stepbysteppainting.net/
Adding this as a resource here, I did a step-by-step program twice in the last few weeks with one of the owl paintings on this website.
SO. MUCH. FUN. And so many requests from kids and parents alike to make it come back!
And now I so badly want to do this one too!
Do you have a particular source you get your canvases for cheaper? We did a huge pack of cheap canvas board, but I could see the amounts adding up pretty significantly if we make this regular.
(Thank you!)
Thank you for sharing that! What a great resource.
I bought canvases from the dollar store, or canvas panels from Amazon. If you can get them for $1 – $2 each, that’s a good deal. For bulk paint and brushes I bought online through Curry’s. Happy painting!
[…] Emoji Paint Workshop […]
Hi there! How long does this program, on average, take to run?
Approximately one hour! Some kids will finish earlier, and some will want to stay later.